Tuesday, March 31, 2015

Golden Poppies

"The Poppy"
by J. Ward 

High on a bright and sunny bed
   A golden poppy grew
And up it held its staring head,
   And thrust it full in view.

Update: April 8, 2015 - This card was in the Top Three at AHSC!
 The Atlantic Hearts Sketch Challenge has given me the opportunity to learn more about my newest addiction. I never dared to enter cards in any challenges previously but I let my friend talk me into it. Since taking the first plunge with Challenge #93 I've grown to enjoy the competition and have entered a few other card challenges as well as AHSC. Here's my entry for Challenge #101:
 
 
Visiting my grandparents' home in upstate New York in the summer time was always a treat. They were immigrants from Scotland and Grandpa always kept his proverbial "English Garden" with great pride. It was  a profusion of color. He had the largest poppies I've ever seen - both scarlet and golden.  
  
I stamped the image with Stazon ink on white cardstock then colored it with non-alcohol markers, blending the colors. The flower centers were colored with a black marker. I used a Versamarker to cover the flowers and buds then heat embossed with clear embossing powder. Using the DTP technique, ink pads in yellow and green were applied to the cardstock then darker green was added by turning the ink pad on its side to create the
look of leaves and grass. After each DTP application, I sponged to eliminate any lines left behind by the ink pads. The sky was applied by sponging only. Wet ink on the clear embossed surfaces was removed by rubbing the card surface gently with a tissue.
 
I highlighted the poppies with a white gel pen, then lightly colored over the dry white ink with the orange marker and wiped off wet ink with a tissue. Poppy centers were dotted with white gel ink as well. Using the black marker, I edged the white cardstock with the black ink and added a little black ink to the bottom of the image using the DTP technique. The stems were
colored with green markers and shaded with black.
 
I love trying different techniques and using emboss resist as a way of masking my focal point was a new concept for me. This was also the first time I had seriously used DTP because I usually end up with a mess.
 
The sentiment was stamped and popped up on Fun Foam and the sequins were added. For more ideas and to join in a challenge, go to the Atlantic Hearts blog.
 
Techniques: Heat embossing, emboss resist, DTP (direct to paper), color blending, stamping, sponging
 
Recipe: Products are Stampin' Up unless otherwise noted.
Stamps: Pleasant Poppies, Studio G (sentiment)
Ink: Mossy Meadow, Pear Pizzazz, So Saffron, Soft Sky, Stazon Black, Memento Tuxedo Black
Markers (non-alcohol): Basic Black, Mossy Meadow, Tangelo Twist, Daffodil Delight, Uniball Signo Gel Pen
(white), Versamarker
Cardstock: Whisper White, Basic Black
DSP: Sweet Taffy Collection (yellow ombre)
Other: Embossing powder (clear), chocolate sequins from my stash, scallop scissors, Fun Foam
Size: A2 (4.25" x 5.5")


Monday, March 30, 2015

Easter Bunny

Happy Easter Bunny
I love the Happy Easter Bunny stamp - it just makes me smile! This cheerful image was used to make a simple card for my granddaughter, Brooke, age 10.
 
The image was stamped with Stazon black ink, colored with non-alcohol markers and cut with a die. I sponged the edges and adhered it to the card base. I added Wink of Stella to the flowers for a little shine and Glossy Accents to the Easter eggs to add dimension.
 
The inside has the same sponged die cut shape adhered to it. There is no stamping on the inside, leaving space for a personal note. The envelope was decorated with a stamp of a rabbit's silhouette.

Techniques: Stamping, sponging, die cutting, coloring
 
Recipe: Products are Stampin' Up! unless otherwise noted.
Stamp: Happy Easter Bunny
Die: Spellbinders Label Twenty-three
Cardstock: Whisper White, Coastal Cabana
Ink: Calypso Coral, Stazon Black
Markers: Coastal Cabana, Calypso Coral, Daffodil Delight, Gumball Green, Pear Pizzazz
Other: ZIG Wink of Stella, Ranger Glossy Accents
Size: A2 (4.25" x 5.5")
 

Sunday, March 29, 2015

Sparkle & Shine

Sparkle & Shine with Vellum and
Exploding Dazzling Details Medium

Card Front:                                                                  Card Inside:


It's a celebration at the Atlantic Hearts Sketch Challenge - Challenge #100 is here! My card is in recognition of each dedicated Design Team member. These ladies "Sparkle and Shine" with their special works of art each week.
 
Let me share the worst first: To finish off the card I was going to add a few dots of Dazzling Details in silver around the sentiment. When I squeezed the bottle, the nozzle flew off, dumping globs of the stuff all over the card. I wiped it away but there is residue all over the vellum. I even found it inside the card. All I could do was go with it! 

The front of the card is stamped on white vellum then heat embossed with black glitter powder and silver metallic powder. The images were colored on the back side of the vellum. The sentiment was die cut then coated with Wink of Stella and Glossy Accents.

I drew the large diamond with a ruler and pencil on black cardstock then again on the back of the glimmer paper. I cut apart the glimmer paper to achieve the facets and adhered them to the cardstock. The black cardstock that shows through was then coated with Glossy Accents. The diamond image is popped up using Fun Foam. I added strips of glimmer paper across the top and bottom of the card - then the Dazzling Details fiasco ensued.
 
The inside is decorated with black heat embossing as well as the continuation of the sentiment, coated with Wink of Stella and Glossy Accents before being adhered.
 
For fun and inspiration, visit the Atlantic Hearts Sketch Challenge blog!
 
Techniques: Heat embossing on vellum, coloring on vellum, stamping, die cutting
 
Products are Stampin' Up! unless otherwise noted.
Stamps & Dies: W Plus 9 Sparkle & Shine
Cardstock: Whisper White, Basic Black
Specialty Paper: White Vellum, Dazzling Diamond Glimmer
Ink: Markers in various colors, Versamark
Other: Dazzling Details (silver), Ranger Glossy Accents, ZIG Wink of Stella, Recollections Embossing Powder (silver), WOW! Embossing Glitter (Black Glint), Fun Foam
Size: A2 (4.25" x 5.5")


Saturday, March 28, 2015

Easter 2015

Blessed Easter -
Welcome Happy Morning!
Thanks to my friend, Sue, for taking the above photo. Unlike me, she is skilled at photography.
At Easter I usually make cards that are less about bunnies and more about God's greatest gift, His Son, Jesus Christ. Easter is early this year and I did not shop early enough for a new stamp. I did have an unused stamp set with a springtime theme from MFT (My Favorite Things) so chose that set combined with stamps from other sets. The new set also lends itself well to making "assembly line" cards. This is one time I could have used the new tool called MISTI, but I'm not yet convinced the purchase will be worth the expense. (MISTI = Most Incredible Stamping Tool Invented)

The stamps for the tulip stems and leaves were inked with various shades of green, spritzed lightly with water and then stamped onto cardstock. Water color paper was not used. The "Smack Down" technique was used when stamping the tulips to give them a look of movement.

Although I spatter painted as a child, it was a technique that I had not previously used on cards. I ended up with some blobs so it was a learning experience. Next time I'll know what to do better.

The top card layer was popped up using a rectangle cut from Fun Foam. I decorated the inside of the card as seen in the second photo. The envelopes were lined with color coordinated DSP and decorated with the same yellow sun and blue tulips.

Techniques: Sponging, spatter painting, Smack Down, water color with stamps
 
Recipe: Products are Stampin' Up! unless otherwise noted.
Stamps: Kinda Eclectic set (sun), MFT Spring Tulips set, MFT Easter Bunny set (sentiment)  
Cardstock: Whisper White, Soft Sky
DSP: 6" x 6" stack from my stash to line the envelopes
Ink: Soft Sky, So Saffron, Daffodil Delight, Melon Mambo, Strawberry Slush, Tangerine Tango, Blackberry Bliss, Old Olive, Certainly Celery, Garden Green, Pear Pizzazz, Memento Tuxedo Black
Other: Pearls from my stash, Fun Foam, Tombow Mono Multi glue, sponges, paint brush
Size: A2 (4.25" x 5.5")

Saturday, March 21, 2015

Multi-purpose Card

All Occasion Card
(no sentiment)
This card could be used as portrait or landscape because there is no sentiment that determines its orientation. The space inside is designed to write a personal note either way. I prefer it as portrait because it can more easily be displayed standing up.
I made this card using the Atlantic Hearts Sketch Challenge #99 as the starting point for my own interpretation of the design. I struggled with this challenge in that I was trying to avoid using the obvious (flowers). But my first two ideas were not to my liking and I finally developed this one - using flowers.
Portrait View: 
 
  Landscape View


I used all of the elements in the challenge but rearranged them a bit to complete my interpretation. Using the flower stamp, I stamped off on scrap then onto the white cardstock to provide a lighter background for the main flowers. I added the green zigzag stamp then fussy cut the edge of the floral background. I adhered it to the card base and then decided to trim away a portion of the card front to match the floral fussy-cut edge.

The three main flowers were stamped and punched, then adhered with foam for dimension. The 1/2" centers were punched from DSP, adhered and covered with Glossy Accents. The petals were touched up with Wink of Stella and curled with a bone folder. The bow was punched from the same DSP as the flower centers and assembled. I adhered it to the green zigzag design and added Wink of Stella. The pink gems were added to bring pink to the upper left corner of the card.

A piece of matching DSP with white cardstock was added to the inside for a message or a stamped sentiment to be added in the future. The interior pieces were cut so that they remain hidden behind the fussy-cut edge. The envelope was stamped with matching flowers. Visit the Atlantic Hearts blog to join the challenge and find new ideas for cards!

Techniques: Fussy cutting, generation stamping, punching

Recipe: Products are Stampin' Up! unless otherwise noted.
Stamps: Flower Shop stamp set, Lawn Fawn Chevron backdrops
Ink: Strawberry Slush, Old Olive
Cardstock: Strawberry Slush, Crumb Cake, Whisper White
DSP: Painted Blooms Collection
Punches: Build-a-bow, 1/2" circle, Pansy
Other: Ranger Glossy Accents, ZIG Wink of Stella-clear, gems from stash, mini glue dots, Fun Foam
Size: A2 (4.25" x 5.5")

Monday, March 16, 2015

Happy Birthday - Using the Cricut

Happy Birthday to Jean

Diamond Winner at Sue's Cricut Challenge!


My friend, Sue, is crazy about her new Cricut Explore. I have a Cricut Expression 2 but have not used it in several years, preferring to use my Sizzix Big Shot and die collection. Sue drew up a sketch and challenged me to make a card based on her sketch, using only my Cricut. Here is the result of that challenge, which is a birthday card for a family member.

All the elements except the stamps were made using the Cricut. I borrowed a variety of cartridges from Sue to accomplish the feat. The most challenging part was fulfilling the 5" x 7" requirement. I am accustomed to making A2 size cards at 4.25" x 5.5" so the A7 seemed like a daunting task to fill the card with elements and without too much clutter. I had fun using the Cricut but I'm not ready to use it exclusively.

The products are from several sources and detailed below.

Thursday, March 12, 2015

Hello - Multiple Occasions Card

Hello
Update: This card placed in the Top Three at theAtlantic Hearts Challenge #98!


Inspiration for this card came from the Atlantic Hearts Challenge, Sketch #98. The card could be used for almost any occasion because of the generic sentiment.
The flower is white cardstock cut three times from the same die and sponged with three ink colors. I curled the petals with a bone folder to give the card depth then popped up each layer with foam tape in varying depths. I finished off the flower with clear Wink of Stella on the petals and added the center with a punched circle decorated with Dazzling Details in Gold Glitz.

The word "hello" was die cut once in foiled cardstock and again in Fun Foam. The foiled cardstock was adhered to the fun foam to raise up the word and also provide a shadow effect. (The fun foam flattens when run through a die cutter but bounces back into shape within a few seconds.) The interior of the card is lined with a white die cut for writing a note and decorated with the gold foiled cardstock and DSP. The envelope was lined with coordinating DSP in a stripe design.

Wednesday, March 11, 2015

Encouragement - Double Dutch Fold

Go Forth and Shine 

This card started out as an entry to a challenge but somehow developed into a card for a family member who recently found a job after a long period of being laid off. Her situation has been heavy on my heart. I was so excited to learn the good news that I made this card for her. The challenge card will be back on my drawing board later today.

The style of the card is Double Dutch Fold. The basic fold can be made using two pieces of cardstock or one piece. I used the one piece method. I remember a neighbor having a "Dutch door" when I was a child and I always wished we had one in our house as well.

After folding the white card base, I embellished it with cardstock and DSP using a few simple cuts and a few die cuts. Because the card base measurements make a shorter than A2 card, I adhered the entire card to the Strawberry Slush cardstock trimmed to true A2 size (4.25" x 5.5").
Card interior:


Techniques: Double Dutch Fold, punching, stamping, die cutting

Recipe: Products are Stampin' Up! unless otherwise indicated:
Cardstock: Coastal Cabana, Strawberry Slush, Crisp Cantaloupe, Whisper White, Dazzling Diamonds
DSP: Birthday Bash Collection
Ink: Memento Tuxedo Black
Stamps: W+9 Design Studio Sparkle and Shine stamp set (front), Verve Stamp Luke 1:45 (inside)  
Dies: Framelits Circles Collection, Spellbinders Lacy Circles, Crafter's Companion Die'sire scalloped rectangles (inside)
Punch: Itty Bitty Accents (stars)
Other: Foam tape to pop up circle w/sentiment, Dimensionals to pop up the stars, scallop scissors to trim the top and bottom.
Size: A2 (4.25" x 5.5")

Monday, March 9, 2015

Happy Birthday - Floral Vellum


Happy 88th Birthday - Floral Vellum
 
 
Today's post is a card I made for my Aunt Millie's 88th birthday. She was my mother's sister-in-law and is the last of that generation in our family. She is a sweet dear lady, having raised ten children with my late uncle. I've lost count of her grandchildren!

I have entered the card in a challenge at The Paper Players.

I recently received the new Sheer Perfection designer vellum pack from Stampin' Up! and used it on the card. More details are below.

Friday, March 6, 2015

Secret Garden

Happy Birthday to Joyce


This card was made for my friend, Joyce. It was also submitted to My Creative Moments: Monday Morning Challenge #4 and CAS(E) This Sketch No. 114. Although I have water colored in the past, this is the first card where I have used a water coloring technique. The Secret Garden stamp and die bundle is one of my favorites and I have used it often. I stamped the floral images with Staz-on black ink on water color paper and colored them with an Aqua Painter pen then die cut them. Dye ink pads were smeared onto an acrylic block palette because I did not have any water color paints. The leaves were stamped and die cut but not water colored. The sentiment was stamped with Versamark and heat embossed in white embossing powder.

Wednesday, March 4, 2015

Framed Papercraft #2

Best. Day. Ever. #2
Here's another "card" using the same technique as the card posted below.


The second design was made to show how the same frame could be used for other designs. The butterfly is attached with repositionable adhesive so was switched when the card designs were switched. I think it would be fun to make seasonal designs to insert in the frame. This was also the first time I tried the inlay technique using cardstock and champagne glitter.

This would be a pleasant item to have on the desk or to give as gifts to coworkers. It may also be something to give for Mother's Day. I used a generic sentiment so that the design could be easily changed and the sentiment would still work for most occasions. Here is the video on how to make this: https://www.youtube.com/watch?v=TSl0IJoLtfk.

Techniques: Stamping on acrylic, punching, die cutting, glitter inlay, cardstock inlay

Recipe: Products are Stampin' Up! unless otherwise noted:
Frame: WalMart (less than $1)
Stamp: Best Day Ever stamp set
Dies: Spellbinders Ovals & Lacy Ovals, MFT Floral Fusion Cover-up Die
Ink: StazOn Opaque Ink in Cotton White
Cardstock: Crisp Cantaloupe, Whisper White, Coastal Cabana, Strawberry Slush
DSP: Dazzling Diamonds Glitter Paper
Punches: Bitty Butterfly, Elegant Butterfly, Martha Stewart border punch
Other: Glue dots, Whisper White organza ribbon, Wow! champagne glitter
Size: A7 (5" x 7")

Framed Papercraft #1

 Best. Day. Ever. #1 
 This first design is my submission to the Atlantic Hearts Challenge, Sketch #97, My Creative Moments: Monday Morning Challenge #4 and the Stamp and Create March Challenge.
I turned the sketch on its side because the acrylic frame is oriented as landscape instead of portrait. This is a not a traditional card in that it is a design inserted into an acrylic frame. The ribbon, doily and die cut are adhered to the paper layers inside the frame. On the exterior, I stamped the sentiment and added the bow and the butterfly.

Sunday, March 1, 2015

Congratulations - Masculine

 Congratulations!


This card was made for my stepson a while ago. He decided it was time to get into better shape. He gave up tobacco, lost weight and started a running program. The image was an inexpensive Internet download from this site. At that time I only had a few Stampin' Up! non-alcohol markers so colored it with what I had. Materials included cardstock and markers but I am unsure what brands of cardstock were used.

Technique: Color blending

Brooke's Quilt

 Brooke's Quilt


I decided to make a play quilt for my granddaughter, Brooke. Since children play on the floor so much, I thought she could enjoy playing with her dolls on this quilt. It is larger than crib size but smaller than twin size. It is totally machine made as well as washable and can be tossed in the dryer. It is simply 8" squares, cut from fat quarters, some of which I embellished with machine embroidery or ribbon and lace, sewn together. Some sashing was added, I quilted it on a standard sewing machine, then the edges were bound, also by machine. All of the quilt fabric came from my sister's stash as she was cleaning her sewing room. The ribbon, lace and fabric for sashing and backing came from my own stash of fabric. This is a very basic quilt with simple techniques because I expected it to get a lot of wear!

Butterfly Top with Capri Pants

Butterfly Top with Capri Pants


Another fun summer outfit for Brooke made in 2009, it is made totally from coordinating fabrics purchased at Hobby Lobby. For the photograph, I purposely spread the fabric out to show all of it. The outfit is identical to the photograph on the Simplicity pattern right down to the fabric choices. It is actually a short dress with a handkerchief hem and Capri pants. I also made the piping for the waistline and the ties at the sleeves and on the pants.

Pajamas

Pajamas


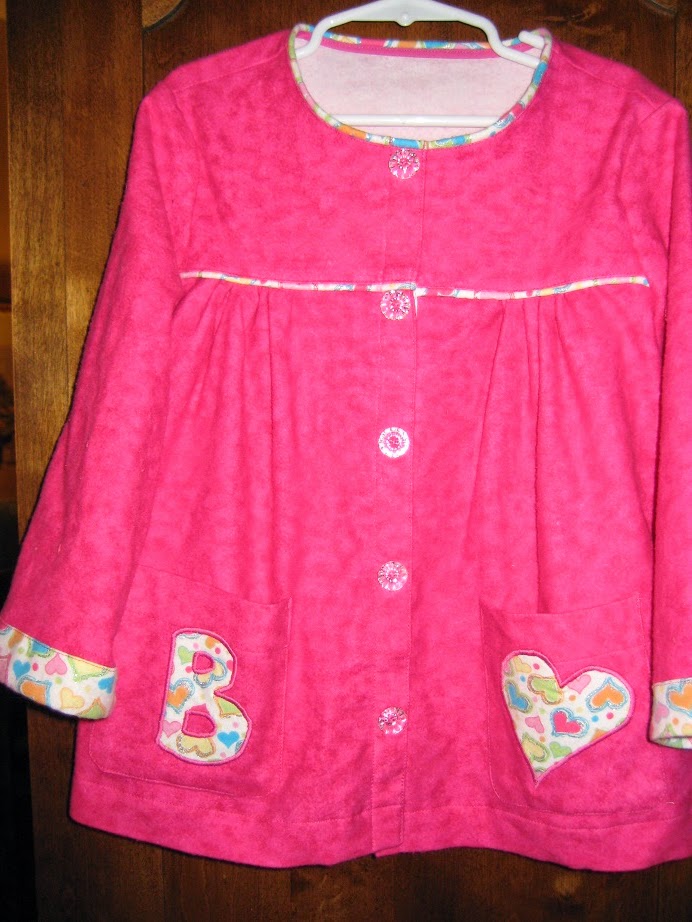
Winter was approaching and my daughter-in-law asked if I would make Brooke some warm pajamas. These were made with cotton flannel each using the same pattern but embellished differently. The front closures are all made with soft snap tape for easy opening and closing and the buttons are for decoration. All tops included matching pajama bottoms. Later, for the traditional "new pajamas for Christmas" I made the fourth top exactly the same but using Christmas print cotton flannel. The green buttons are decorative and soft snap tape provides the front closure. The pajama bottoms were made from the same snowflake fabric from which the pockets were made.